Wednesday, March 28, 2012

Jill's Dinning room color inspiration!

So I have just been reading my past blog posts and I'm mortified by all the typing errors!!!!  You would think I have been texting these posts.  I hope you can forgive me and love me anyway!
I'm in the middle of painting my office and my house is falling down around me.  The only person I let in is Stephanie as I have to because she is my running buddy and I know she won't judge.  That being said I can't show you any pictures of my messy house so I will show you some of my sisters dining room.  We are in the final stages of a great makeover.  The feeling we are shooting for is fresh, young, hip, and of coarse unique.  There is nothing worse than having a room that looks like everyone elses.  Check out a few progress pics.  I will give the grand finale when we get it put back together.

This is my color inspiration!!  My favorite coat.  Can you see the button falling off and how dirty it is?  That is true love!!

Step 1 we painted the top of the chair rail white and the bottom kelly green (coat color)

Step 2 we stenciled the bottom of the chair rail with the white color .

It is shaping up nicely!  I just want to stand and stare at it.  Does anyone else do that?
Last peek!  All the furniture in this room is getting painted and we are introducing some great new fabric!  You will pass out when you see the before and after pics.  Well you will at least see a big difference.  I hope to show you the final result this week!

Friday, March 23, 2012

Updated Fireplace!

Happy Friday Friends!  I have no idea where my time went this week?  I feel like I woke up Monday morning overwhelmed with the week to come, I blinked and it's now Friday!  I'm so excited to show you my finished fireplace today.  Before I show you let me just give you the background story.  So when we built this house my hubby gave me a very strict budget that I had to pick out everything with.  Needless to say by the time I got to my fireplace in the family room I had no more money.  I remember telling the tile shop just give me whatever I can get standard with the builder.  I have hated the way this fire place looked from the moment we moved in!  I begged my hubby to try a little do it yourself project that I had seen on HGTV a gazillion times.  (They make it look really easy!!!!)  Brad is much smarter than I and with passion he refused but he did give me the green light to have someone else do it.  Let me just say that after seeing what went into this tile instillation Mike my tile expert saved this house from some swear words and possibly a heated conversation or two!  So here it is finally...

Here is the before.  Brad had just tore off the huge dark brown tile.  Thats right it was basically brown on brown on brown.    Can you see the monster T.V. peaking out from the left side of the fire place?  ( Thats is going away too!)


This is our new friend Mike Sima!  If I could read his mind right now he is swearing up a storm.  He tore out that bottom row 4 times to get it perfect.  To my untrained eye I was thrilled with it but I let him get it just right.  I thought I had picked out the best tile for easy installation but it was not easy at all!  Mike had to cut all those tiny tiles and individually place them around the edges.  Sorry Mike!!!
I chose a hexagon marble tile.  I think it looks vintage with a updated twist.  When you walk by it almost sparkles.  Stephanie's 1st comment was "It is so shinny"  We also painted out the hearth and wall surround with the color Steamed Milk from Sherman Williams.

The bottom of the hearth is large marble tiles.  I love how clean this looks.  My mom thinks it looks "dressy" which is exactly what this room needed.  It is important to keep a balance if you have vintage finds in your decor like I do.  Before you know it your room will look like a flea market instead of a room with interest and character.

My monster T.V. has been replace with a smaller one and my handy hubby built those awesome floating shelves out of hollow core doors.  The only problem was the electricity and cable were down below where that basket is and I refused to have any cords so we had a electrician move the outlets for $60.  Totally worth that and so much more!!  Let this be a lesson...  Don't let a small bump in your plan (like the plug is in the wrong place) keep you from fulfilling your vision.

Thats it for this girl!  I'm counting down to an appropriate time for a glass of wine.
P.S. for local readers our Tile expert was wonderful to work with and his name again is Mike Sima 402-871-3678 if you need some tile assistance.


Tuesday, March 20, 2012

Before and after dresser


Do you remember my beloved dresser I had in my kitchen?  Well it is on the move and along the way it got a slight makeover.  

Here she is before her move

Here she is at her new home in the Hearth room.


A quick coat of white paint in the raised areas of the dresser transformed this little corner
 of my hearth room.


Hope you are having a great 1st day of Spring!!


We are in full bloom here!  The grass is green and our eyes are itchy and red.  Not that I'm complaining!

Monday, March 19, 2012

Oh for the love......

OMG I must share.....all the while I was furiously blogging my last post, this is what my 4 year old had pirated!  Mind you, I had checked on the status of my house more than a few times during that sitting and somehow he'd not only climbed onto the counter for the peeps, but somehow managed to get the jelly beans out of the apothecary jar without a single clanking of the glass.  How!?!?!  I was only alerted of the crime because of the telltale blue ring around his mouth.  He'd stuffed one peep in his mouth and stashed the other four plus the jelly beans in his fave hiding spot (behind the couch!) I only found his stash because, as I started the questioning, he immediately took refuge in his "spot", and inadvertently led me right to it. (much to my great pleasure, as dinner was only a few minutes away!)  Despite having his loot confiscated, I must say - nicely done, although eat faster next time, my boy. Ha!


Sunday, March 18, 2012

Entryway walls

This blog request is for Darci.  We all have those awkward little walls that present a design challenge in our homes.  Darci mentioned she was battling her entryway so I thought I would share a picture of mine since I just relocated a large mirror and I'm in love with the results.  I hope this offers a spark for you to address your own awkward space.

This large mirror made it feel like the small wall that I constantly worked at was eliminated!


I added drapes to frame out my front office.  I think it adds visual interest and of coarse you know how I love the layered look.

I bought this marble table for $30 at a thrift store.  Stephanie gave me that trophy for a birthday, I love it!  I wish I could find 10 more.  The crystal lamp is also vintage I just added the glass beaded shade which was on clearance this spring at pottery barn.

I finally can look out my window and see color!  That means we will be moving outside soon.  I'm in search of that perfect new umbrella and maybe some new pillows for the patio.  This week the tile guy is coming to update my family room fireplace.  I hope that does not disappoint you.  I love to try do it yourself projects but my hubby drew the line at tile.  I can't blame the guy!  Can't wait to show you the finished project.


Wednesday, March 7, 2012

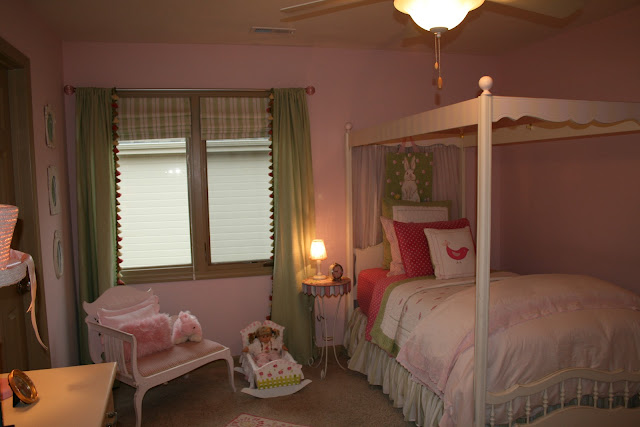
Little girls room


Brynn is my little 8 year old girlie girl.  She has started asking for a "big girl room"!  I have put her off for 1 more year but her cute little girl room is one of my favorites and I will never forget the time we spent together reading books or playing babies in this room.

I bought this bed on a antique outing with Stephanie.  Brynn was still in her crib but I could imagine her sleeping in this adorable bed.  I hung sheer drapes behind the bed which I think just adds another layer of texture.  I love the layered look on a bed.  I have pb kids mixed with target and they blend great!


I'm sure you will never guess where I picked this little bench up?  Thats right vintage thrift find.  $20 I thought for that price I could find a use for it.  I painted it pink and recovered the seat.

The inspiration for this accent wall came from a t-shirt I found online.  I love the simplicity of it.  (because that means I could copy it and paint it on the wall.)  Dresser was a freebee from Brad's Mom.


Here is a close up in case you want to try it out yourself.


We have adopted the slogan of the U.S. postal service.  "If it fits it ships"  Stuffed animals and babies have to fit in these 2 bins.  If a new addition would like to come in a old one needs to go to a little girl who has less than we do.  
These are just off the rack drapes that I added some trim to.  I bought the trim at Hancock.
Brynn's Bathroom


All the essentials are kept on a silver tray and I placed a small lamp on her counter in place of a night light.


Well I hope I have not blinded you with all the pink!!  I think I went a little crazy when I got to decorate a little girls room for the first time.  I wonder what the big girl room will look like???  The future bed is already sitting in my basement.  It is of coarse vintage and of coarse it was cheep cheep cheep so I could not pass it up.  Until next time...

Monday, March 5, 2012

Anthro lamp shade DIY


Good Monday Morning friends! What a crazy weekend I have had. The kids activities consumed us and I would kill for a cup of coffee right now!!!(Gave it up for Lent) Mom if you are reading this I promise I will call you today, I did not fall off the face of the earth. So I did manage to squeak in one small project and I love the way it turned out. I have been in love with all the ruffle lampshades at Anthro for quite some time but there is no way I could bring home a lampshade that cost $200!! I have seen many bloggers attempt to make their own and of coarse if they can do it I can do it!! And you know what that means? You can do it too! Take a gander at my step by step.


Here is the Lampshade I'm redoing.  I like it, but I'm tired of the navy trim.  I tried to rip it off but I could see that it would ruin the shade so in an effort to not have a color commitment I'm adding burlap ruffle.


Cut a whole bunch of strips of burlap 2x the length of your shade.   I know I'm not being very scientific but thats not how I roll.  I did not even measure to make sure the strips were the same width, I just started cutting.


Find the middle thread and just start pulling on it.  Like magic a ruffle will form out of your strip of burlap.  

                               
One strip down only a million more to go.  Not really but it feels like it right now.
Just keep glueing glueing glueing.
Trim all the stray string you see as you go.  It is looking cool already which makes me keep going.
Done and done!  I love it.  I think it looks better than the one in the store and it only was $8.00 worth of burlap instead of $200!  

Thursday, March 1, 2012

Seasonal drapes


My poor husband climbs his ladder and takes down the cornice boards he made for me twice a year.  I change the fabric on the window treatments in my dinette in the spring and again in the fall.  Here are some pictures of the finished spring treatments.  Noticed I tried something new this year and placed our monogram in the middle of each cornice.  P.S.  I know this is crazy but it is like a breath of fresh air, and even my hubby loves the seasonal change. (Don't judge)

There are those other 2 spider back chairs I bought and mentioned in my office blog post.  These I painted white and covered the seats in linen.
This table extends to a oval.  After the holidays I shrink it to a circle and use the side benches so that I can fit several mini people on each side of the table and there is more room for the kids to fly in and out of my back door.

Close up of the monogram and trim.


My hubby has promised me some paint and trim work in my new office space.  I can't wait!!  I have so many great ideas for that space.  I can't wait to show you what we come up with!